FormFlow - Forms Feature Setup
Important
Information and features vary according to the roles to which you belong and the permissions associated with those roles. For more information, contact your module manager or your campus support team.
You can add, remove, rename, and reorder the FormFlow features on the appropriate Campus Portal pages.
Log in to the Campus Portal as an administrator.
From the profile drop-down options, select Site Manager.
From the side menu, click Tabs to see a list of existing tabs.
Click the Edit icon next to the tab name where your page is located.
Under Portlets available to pages in this tab, click the button for FormFlow - Forms to toggle it to Yes.
Click Save at the bottom of the page.
Click Exit to portal home.
Log in as the Campus Portal administrator.
Access the page where you want add the FormFlow - Forms feature.
From the Admin Toolbar, click Options.
Click Add a new feature to this page.
Click General Purpose features to view a list of the general purpose features.
Click FormFlow - Forms to open the Options page.
Make any additional changes to the page name, layout or features on the page.
Click the Back to... link to return to the feature page.
Note
When you choose to add the FormFlow - Forms feature as its own page, it will appear as a link on the sidebar for the currently selected tab.
Log in as the Campus Portal administrator.
Select the tab where you want to add the feature.
From the side menu, click Add a Page.
Click General Purpose features to view a list of the general purpose features.
Click FormFlow - Forms to create the FormFlow page.
Make any additional changes to the page name or layout.
Click the Back to... link to return to the feature page.
Warning
If you delete FormFlow - Forms from a page, you will also delete any forms you created along with the submission data stored in the database for that form. The deletion cannot be undone and the data cannot be recovered. If you need to remove FormFlow - Forms from a page, you can export your forms and import them into another instance of FormFlow - Forms at another time.
Log in as the Campus Portal administrator.
Navigate to the page with FormFlow - Forms.
From the Admin Toolbar, click Options.
Click the link for the feature you want to remove.
Click the Delete... or Stop sharing... button in the confirmation pop-up.
Tip
If a second pop-up window appears, click the Delete button.
Important
Information and features vary according to the roles to which you belong and the permissions associated with those roles. For more information, contact your module manager or your campus support team.
Log in to the Campus Portal as an administrator.
From the profile drop-down options, select Site Manager.
From the side menu, click Global Portlet Operations.
Click FormFlow - Forms to opent the Global Operations page for FormFlow - Forms.
Select which groups will receive access to FormFlow - Forms by clicking the Allow Access option to Yes (allow access) or No (deny acces).
Click Save.
Important
Information and features vary according to the roles to which you belong and the permissions associated with those roles. For more information, contact your module manager or your campus support team.
Users must have administrative permissions to access and manage FormFlow - Workflow. These permissions let users set up Workflow tracks that can be connected to form responses.
Log in to the Campus Portal as an administrator.
From the profile drop-down options, select Site Manager.
From the side menu, click Global Portlet Operations.
Click J1 FormFlow - Workflow to open the Global Operations for FormFlow - Workflow.
Select which groups will receive access to FormFlow - Workflow.
To allow access, click the button in the Allow Access column to toggle it to Yes.
To deny access, click the button in the Allow Access column to toggle it to No.
Click Save.
Important
Information and features vary according to the roles to which you belong and the permissions associated with those roles. For more information, contact your module manager or your campus support team.
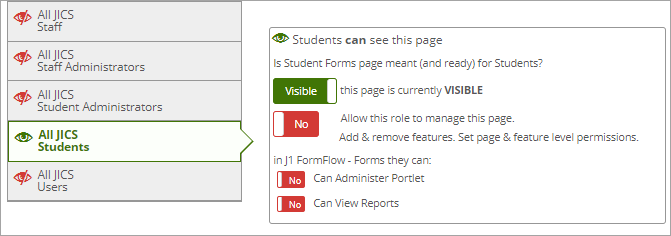
You can set up access permissions for each function on the page. This lets you control who can see what functions on the page. FormFlow - Forms has two functions:
Can Administer Portlet allows administrative user groups to create and manage forms, set up database configurations, and manage the permissions and options for the FormFlow - Forms page
Can View Reports allows user groups to view a list of submitted forms, view submitted information, and export form data to Excel
Most Campus Portal roles accessing FormFlow - Forms to complete a form won't need any additional FormFlow - Forms permissions.
Notice
Students completing a vehicle parking pass request form don't need additional permissions to administer the feature. They only need to belong to a Campus Portal user group with permission to view FormFlow - Forms. See Grant Users Access to FormFlow - Forms for additional information.
Log in to the Campus Portal as an administrator and navigate to the page with FormFlow - Forms.
From the Admin Toolbar, click Access.
Click on the Campus Portal role you are setting up permissions for. If the role has not already been granted access to the page, click the button to toggle it to Visible.
Select Yes for the additional FormFlow permissions you want to grant access to.
Allow this role to manage this page grants management and edit access to the page.
Can Administer Portlet grants administrative privileges to a role.
Can View Reports permission grants view report privileges.
You might want the Admissions Administrators to have administrative access to the FormFlow - Forms page so that they can build, manage, and update online application forms.
View reports lets users review the form submissions that come in, but not manage them or update responses. For example, if your school has a vehicle registration form and the Student Affairs office builds and manages the form, you might want the Security office to have view reports submissions in case they need to search for vehicle registrations.
Important
Information and features vary according to the roles to which you belong and the permissions associated with those roles. For more information, contact your module manager or your campus support team.
Note
Any database connections you set up are available to all forms within any FormFlow or Workflow instance in your Campus Portal.
Database connections let you exchange information between your form and the J1 database, a custom ICS NET table, or your own custom table. Database connections use ODBC connection strings. When J1 Desktop and the Campus Portal are installed, a J1 database connection is created for you based on your Campus Portal Site Manager settings. Jenzabar recommends verifying the connection string before using the form, and deleting, updating, or creating different connections as needed. If you import a form and no database exists, the feature will create a database but will not provide a connection string. An administrative user will have to manually update the connection string.
Caution
Using a standard ODBC connection string to SQL Server requires that TLS 1.0 be enabled on the server. Some security standards require that TLS 1.0 and TLS 1.1 be disabled on the server and force the use of TLS 1.2.
Connection strings with the driver set to “SQL Server” will not work when connecting to a server with TLS 1.0 disabled. To fix the issue and ensure compatibility moving forward, the connection string driver should be updated to reflect the current version of SQL Server Native Client that is installed on the Campus Portal web server. An example connection string is below:
DRIVER={SQL Server Native Client12.0};
SERVER=myserver;UID=te_pgmr;PWD=password;
DATABASE=TmsePrd;Application Name=FormFlow - Forms;
This currently only impacts customers that have the requirement to disable TLS 1.0. However, it is recommended that all clients follow this practice to avoid compatibility issues moving forward.
Tip
Ensure the user specified in the database connection string has permission to access the objects defined in your data sources, mapped statements, or stored procedures.
Important
Information and features vary according to the roles to which you belong and the permissions associated with those roles. For more information, contact your module manager or your campus support team.
Important
The USPS zip code look up feature is only available for schools licensed to use Candidate features.
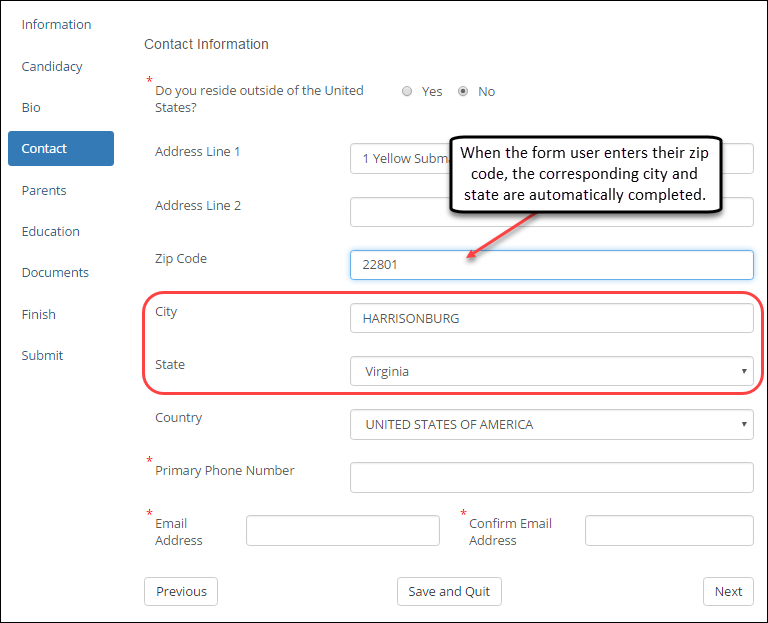
Using the USPS zip code look up feature, the form user enters their zip code and the corresponding city and state fields are automatically completed. Once the USPS Zip Code feature is set up, it does not have to be set up again for other forms.
Setup for this feature has four steps:
Set up an account with the USPS (First time only)
Enter your USPS credentials in the Campus Portal Database Configuration Settings (First time only)
Configure the Zip Code and City/State Fields on your Form
Set up the Zip Code Data Validation (Optional)
Tip
If your school does not have a business account with the USPS, you'll need to create one. This is a free service. You only need to create an account.
Access the USPS business website.
Sign up for the account.
Note
USPS will send you an API Account URL and Username. USPS hosts the API and your school sets up the account to access it.
Caution
Do not share your account information with other departments/schools or USPS will suspend your account.
Tip
The following steps involve updating the configuration table. You may need to work with your IT administrator to make these updates.
Access your school's Campus Portal database.
Access the dbo.FWK_ConfigSettings table.
In the C_USPS API Url row, enter the USPS-provided API URL.
Notice
http://production.shippingapis.com/ShippingAPI.dll
In the C_USPS Username row, enter the USPS-provided username.
Click Save.
Restart the IIS (IISRESET) to commit the changes.
Tip
Jenzabar recommends doing this off hours as it will temporarily disrupt your Campus Portal for connected users.
Tip
If you are still setting up your form and haven't added the zip code field yet, you can return to these steps later.
Log in to the Campus Portal as an administrator and access FormFlow - Forms.
Click Manage Forms.
Click on the form you want to update. The admin view of the form displays.
Right-click on the Zip Code question and select Properties to open the Edit Item pop-up.
Click Settings.
From the Validation drop-down, select ZipCode.
Click Address Tools.
From the Populate City drop-down, select the Unique ID for your City form question.
From the Populate State drop-down, select the Unique ID for your State form question.
Click Save.
Tip
Jenzabar recommends setting up a zip code validation as a best practice. This ensures the user enters a valid zip code format otherwise it cannot be used by the API to find the corresponding city and state.
Log in to the Campus Portal as an administrator and access FormFlow - Forms.
Click Manage Forms.
Access the Data Validations page in one of the following ways.
Click Site Administrators. When the Site Administrators page appears, click Data Validation.
Click on the name of the form you are working with. When the form appears, select Data Validation from the Tools menu.
From the Tools menu, select Data Validation.
Select ZipCode from the Validations drop-down.
Note
The pattern and message that appears when the form user enters an invalid format is provided by Jenzabar. You can update the Invalid Message as needed.
Click Save Validation.
This feature is provided free of charge by the USPS. You only need to create a USPS account.
Important
Information and features vary according to the roles to which you belong and the permissions associated with those roles. For more information, contact your module manager or your campus support team.
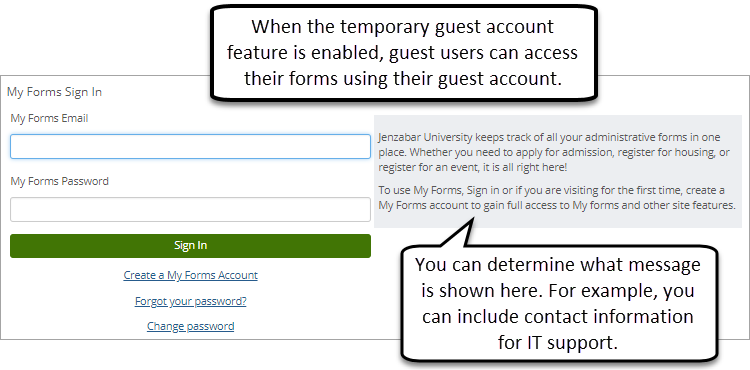
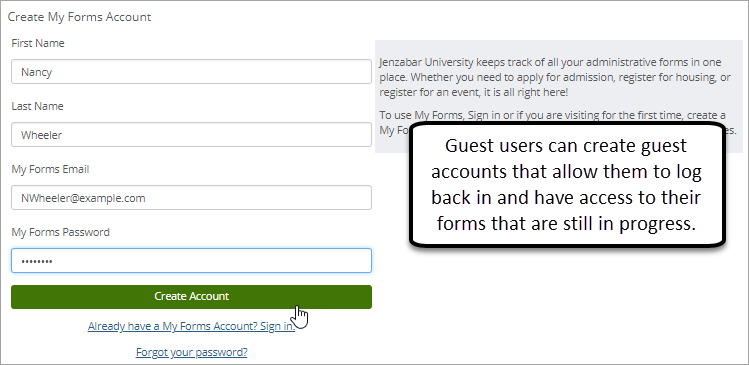
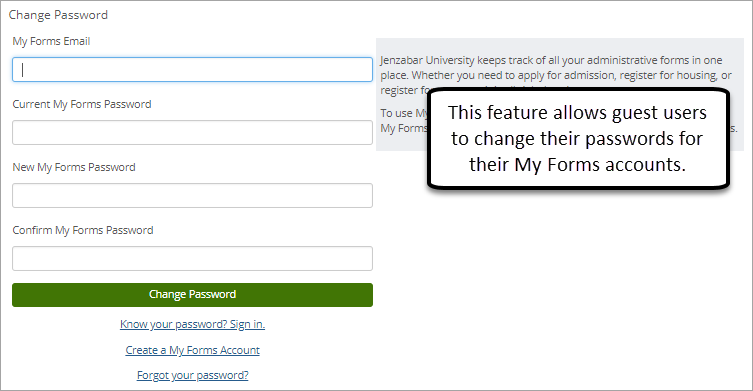
You can set up FormFlow to allow users to create a temporary guest account to access the FormFlow forms. The guest account will let them save and return to partially completed forms and view previously submitted ones. This is typically for guest users that do not have a Campus Portal account.
Note
The My Forms guest account can only be used to access FormFlow - Forms. It does not let the user access any of the other features in your Campus Portal.
Tip
The password uses the same validation configuration used for your Campus Portal passwords, but is not a user's Campus Portal password. Password validations are defined in the Campus Portal Site Manager > Framework Settings > Security.
Caution
Ensure that only forms you wish for guest users to access are added to your guest accounts.
Log in as the Campus Portal administrator.
Navigate to the page containing the FormFlow - Forms feature.
From the Admin Toolbar, click Settings.
If the page has multiple features, go to the drop-down and select the FormFlow - Forms feature.
From the Access Type drop-down option, select External Signup.
In the Login Instructions field, update or enter information you want show form users.
Notice
This might be a brief overview of the feature or instructions on how to set up or log in with their temporary account.
Note
HTML tags must be used to format your login instructions.
Click the Save Changes button.
Note
When external users access the form via a direct link to the form, users will be directed to the My Forms sign in page and can either log in to their existing account or can create a temporary account.
Log in as the Campus Portal administrator.
Navigate to the page containing the FormFlow - Forms feature.
From the Admin Toolbar, click Settings.
If the page has multiple features, go to the drop-down and select the FormFlow - Forms feature.
In the Password Reset Email Subject field, enter in the subject of the Password Reset email that is sent out to users.
In the Password Reset Email Body field, enter in the email body text that is sent out to users.
Tip
Use @@Password as a placeholder for the user's new password. Use @@ReturnURL as a placeholder for the return url.
Note
HTML tags must be used to format your login instructions.
Click the Save Changes button.
Log in to the Campus Portal as an administrator and navigate to the page with FormFlow - Forms.
From the Admin Toolbar, click Access.
Click on the Guest Campus Portal role to open the permissions pop-up.
Click the toggle to Visible if the page is hidden from guest users.
Note
You should not give Guest users any additional permissions other than making the page visible to them.
Click the Back to... button to return to the previous page.
Important
Information and features vary according to the roles to which you belong and the permissions associated with those roles. For more information, contact your module manager or your campus support team.
Adding a File Upload question to your form lets form users upload a file as a part of completing the form. You can determine what file upload types are allowed and where files will be stored. File size limitations are determined by your school’s Internet Information Services (IIS) configuration, which is typically 2GB. Schools licensed to use Candidate features can also map this question back to the J1 Process Internet Submissions window where it can be reviewed, processed, and added to a candidate's record.
There are four basic steps to allow file uploads:
Define where files will be stored on the web server
Add a File Upload question to your form
Tip
See File Upload for more information.
Limit types of allowable file uploads (Optional)
Specify a file naming convention for uploaded files (Optional)
You can also use the J1 Mapping feature for file uploads with these additional steps for J1 Desktop.
Important
The mapping to J1 feature is only available for schools licensed to use Candidate or Student features.
Verify or connect to your school's database
Tip
See Database Connections for additional information.
Verify or set up Attachment Use Codes in J1 Desktop
Verify or set up file extensions available with the Attachment Use code in J1 Desktop
Map the File Upload question to the appropriate J1 Desktop table
Log in to the Campus Portal as an administrator and access FormFlow - Forms.
Click Manage Forms.
Click on the form you want to update. The admin view of the form displays.
Click Form Settings to open the Form Information pop-up.
Click the Settings tab.
In the File Upload Root field, enter the path to the Campus Portal server location where the files will be stored.
Note
Permits @@SubmissionID only. @@SubmissionID will be replaced in the File Upload Root path with the form’s submission ID when the form is submitted. If you use this variable in the upload path, a folder will be created using the unique ID of the form. For example, if you want all Transcript Requests to go in the same network file share, but you want each submission in its own folder, you could make the path C:\Transcript Requests\@@SubmissionID.
Click Save.
Log in to the Campus Portal as an administrator and access FormFlow - Forms.
Click Manage Forms.
Click on the form you want to update. The admin view of the form displays.
Right-click on the file upload question and select Properties. to open the Edit Item pop-up.
Click the Settings tab.
In the Allowed Extensions field, list the file types you will allow an applicant use to upload their documents (e.g., .docx, .pdf, etc.).
Click Save.
Log in to the Campus Portal as an administrator and access FormFlow - Forms.
Click Manage Forms.
Click on the form you want to update. The admin view of the form displays.
Right-click on the file upload question and select Properties. to open the Edit Item pop-up.
Click the Settings tab.
Enter a naming convention for uploaded files in the File Name Format field.
Tip
You can use literal string replacers to use information from the form to make the naming convention unique.
Click Save.
Log in to J1 Desktop and access the Attachment Type Definition window.
Right-click and select Add Row.
In the Attachment Type Code field, enter a unique code that can be used to identify the attachment when you associate file extensions with it (e.g., APP_ESSAY for application essays).
Enter a Description for the attachment type.
From the Use Code drop-down, select AD_CANDCY.
Repeat steps 2 - 5 for each attachment type you want to allow.
Save.
Log in to J1 Desktop and access the Make File Extension Available for Attachment window.
From the Attachment Use drop-down, select AD_CANDCY.
Select the Make Available checkboxes for the attachment types you want to allow form users to submit and to be mapped to the J1 Process Internet Submissions window.
If a particular file attachment type isn't listed:
Click the Create a new file extension link. The Define Allowed File Extensions window appears.
Right-click and choose Add Row.
Enter the file type extension.
Enter the appropriate description.
Save.
Close the Define Allowed File Extensions window.
Save.
Tip
If you are using the online application template, the mapping to the Internet Processing window is already set up for you.
Log in to the Campus Portal as an administrator and access FormFlow - Forms.
Click Manage Forms.
Click on the form you want to update. The admin view of the form displays.
Right-click on the file upload question and select Properties. to open the Edit Item pop-up.
Note the question's Unique ID on the Definition tab.
Click Cancel to close the Edit Item pop-up.
From the Tools menu, select J1 Mapping Tool to open the Internet Submissions Mapping page.
From the Form Type drop-down, select the type of form you are mapping.
Tip
If you are working with an online admissions application, select Admissions Application.
Select the table where you want to store the attachment.
Tip
Only tables that can be mapped to the J1 Process Internet Submissions window for the selected form type are available.
Note
This allows the attachment to be viewed from select J1 Desktop windows.
Click Add New Row.
Find the table column to be mapped to the attachment.
From the corresponding drop-down, select your form question's Unique ID.
Click Save.
Click Done.
There are restrictions to who can download files that are uploaded in FormFlow - Forms. You must have Can review permissions to the FormFlow - Forms feature where the file was originally submitted. Additionally, at least one of the following conditions must be met:
You are the original person to submit the form
You are a Campus Portal administrator
You have administrative permissions to the FormFlow - Forms feature where the original submission was submitted
You have Can view report or Can admin this portlet permissions to the FormFlow - Form where the original submission was submitted
You are an approver assigned in Workflow to approve the document
Important
Information and features vary according to the roles to which you belong and the permissions associated with those roles. For more information, contact your module manager or your campus support team.
You can collect fee payments and donations from your form by:
Setting up a payment profile
Mapping information such as name and address the form user enters on the form to the payment feature (Optional)
Assigning the payment profile to your form's submission button to send it to the payment feature
If you are collecting payments, your school may also choose to provide fee waivers. You can associate waiver codes with a hard-coded data source or store them in a custom table.
For these features to work:
You must have a connection to the J1 database set up in FormFlow.
Tip
This step should have already been completed if you set up your database connections.
You must have read/write access to the J1 database tables the form is accessing and collecting waiver code information from or saving information to.
Right-click on your form's submission button and select Properties. The Edit Item window appears.
Select the Rules tab.
From the drop-down options next to the Payment: Use Profile drop-down, select the profile you want to associate with the form.
Click Save.
From the FormFlow main menu, click the Tools menu and select Data Sources.
From the Data Source drop-down, select JZB- Online Application Waiver Codes to use as an example.
Tip
Make a copy of the provided JZB - * data sources as they may be overwritten in a future release.
From the Use Database drop-down, select the database you are using to store the waiver codes.
Note
This could be your J1 database or another external database you are using with FormFlow - Forms.
In the Data Source Query field, update the Jenzabar-provided SQL query that honors the waiver codes as needed.
Click Save Data Source.
Click Done.
Access the Finish tab of the online application form.
Right-click on the Waiver Code question and select Properties. The Edit Item window appears.
Click the Settings tab.
Verify the Waiver Code Datasource field has JZB - Online Application Waiver Codes selected. If not, select it.
Click Save.
Note
When an applicant enters a waiver code you have entered in your database, they will be able to complete the submission process without being charged the application fee.
Log in to the Campus Portal as an administrator and access FormFlow - Forms.
Click Manage Forms.
Click on the form you want to update. The admin view of the form displays.
Right-click on the Waiver Code question and select Properties to open the Edit Item pop-up.
Click the Settings tab.
From the Waiver Code Data source drop-down, select the blank option.
Note
This ensures the question isn't looking for a value from your database.
Click the Rules tab.
Click Add Step.
In the If the answer value is field, enter the waiver code.
Notice
Your school may give a waiver code of FREE to college fair attendees.
From the event drop-down, select Payment: Override Balance.
Repeat steps 5 - 7 if you have more than one waiver code.
Click Save.
Note
When an applicant enters a waiver code you have entered here, they will be able to complete the submission process without being charged the application fee.
Right-click on the Submit button and select Properties to open the Edit Item window.
Select the Rules tab.
From the default #2 And Payment: User Profile, select Payment: Override Balance?
Click Save.
Important
Information and features vary according to the roles to which you belong and the permissions associated with those roles. For more information, contact your module manager or your campus support team.
Use the Form Login Pages tab of the Site Manager to create and view forms that display to your users when they log in. You can create an unlimited number of form login pages, and they’re displayed to users in the order you set.
Caution
Make sure the queries that determine form display are efficient so that users can log in quickly.
If form login pages already exist, they display in this table. You can see the form’s name, whether it’s required and/or active, and the start and end dates it displays to users (if applicable). You can also delete the form from this list. Click on a form to edit it or see more details, including its priority level, target roles, and which users access is limited to.
When you click Add login page configuration to create a new form, or click the name of an existing form, the setting detail page appears.
Note
Form login pages don’t have the following features typically available in FormFlow:
Accepting a payment
Display a thank you message on finish
Redirect to an external URL on finish
Log in to the Campus Portal as an administrator.
From the profile drop-down options, select Site Manager.
From the Site Manager side menu, click Form Login Pages.
Click the Add login page configuration button.
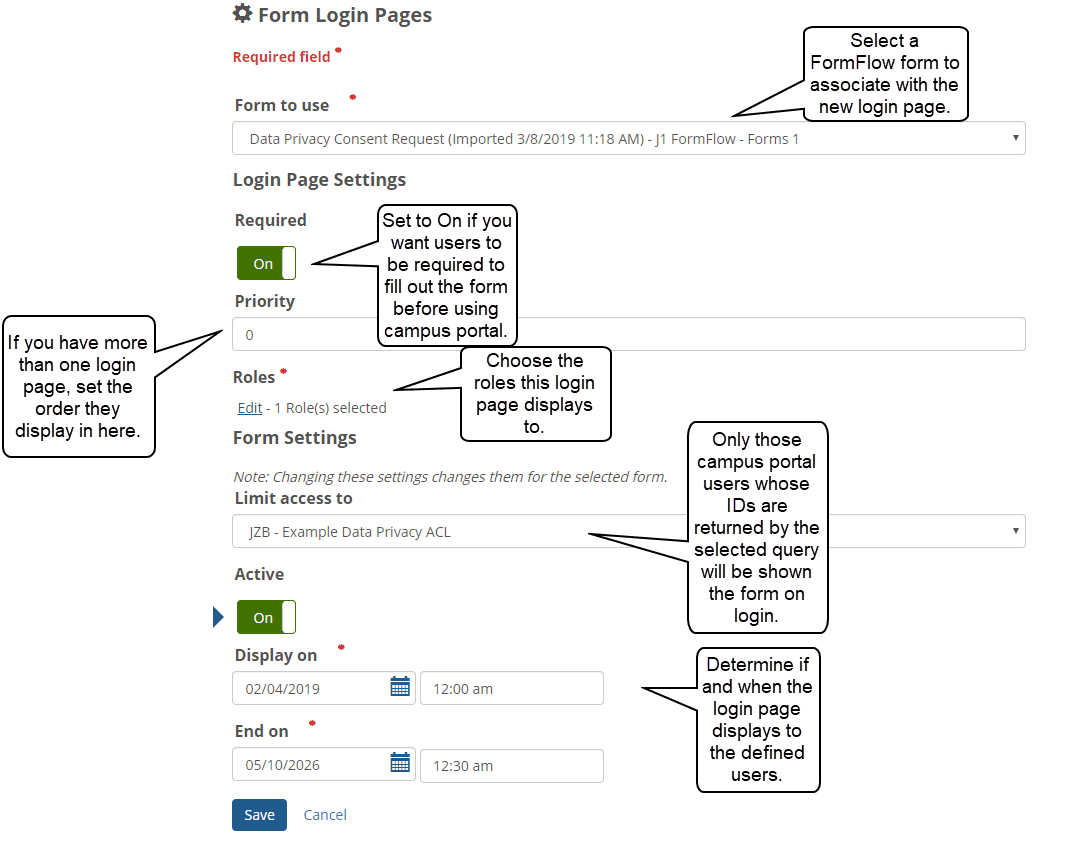
From the Form to use drop-down menu, choose a form to associate with this form login page.
Complete the Login Page Settings section.
Required: The required toggle button is set to Off by default. Toggle the button to On to require users to complete the form after they log in.
Caution
If Required is set to On, after logging in users must either complete the form or log out of Campus Portal.
Priority: Enter a priority value for the form.
Note
If your school has more than one form login page associated with a user, this priority value determines the order in which they are shown to the user at login.
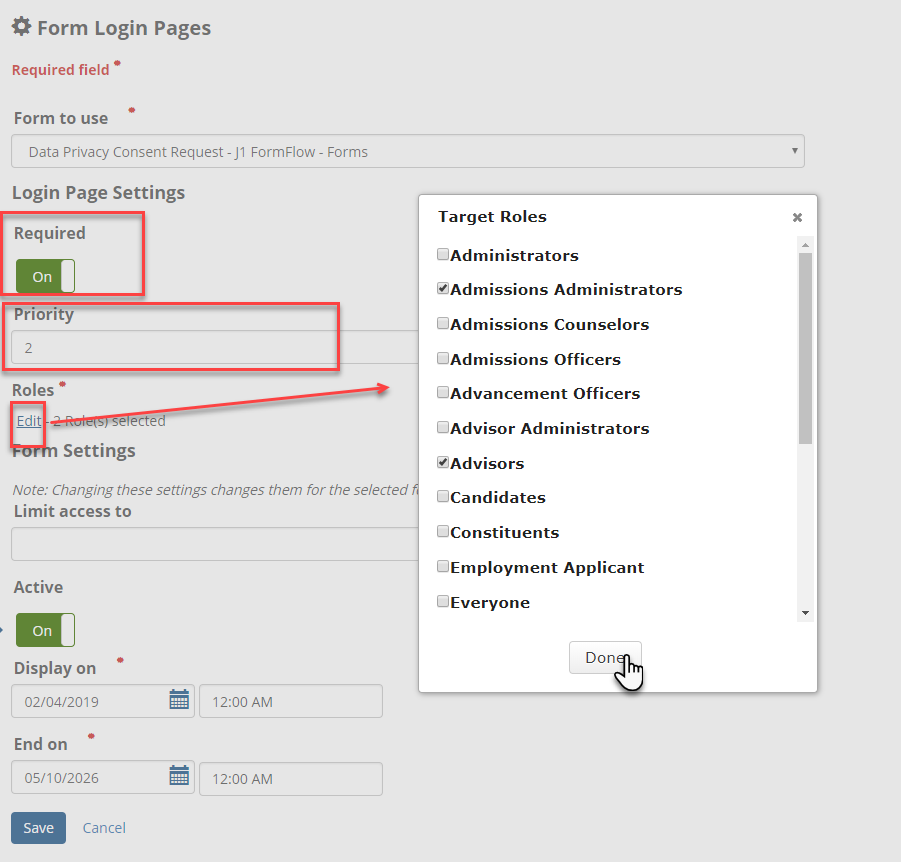
Roles: Click Edit to choose roles. A pop-up appears with a list of your organization’s available roles. Choose the roles you want to associate with this form login page and click Done.
Complete the Form Settings section.
Caution
These settings are populated based on the selection in the Form to use field. Changing settings in this section also updates the selected form.
Limit access to: Use the drop-down to limit who sees this form login page.
Note
The Limit Access to field is optional. If no query is selected, then it will apply to everyone in the selected role(s) only the form will display to the user each time they log in until they've filled it out. If there is a query selected, the user could possibly be prompted with the form multiple times–as long as their ID is found in the query results. This will allow schools, for example, to ask the student to fill out the consent form once per term. If they have a consent submitted during a particular timeframe, then they won't get prompted again, but once the timeframe has expired (e.g., the new term has started), then the user would be prompted to submit it again for the current term.
Active: The active toggle button is set to On by default. Toggle to Off if you don’t want the form login page to display to users.
Display On/End On: Set the dates and times to display the form login page to your users.
Note
A form login page must be Active and the current date must be between the start and end dates for it to display to users.
Click Save.
Tip
If the save is successful, you are directed to the Form Login Pages list view with the new form login page listed. If the save is unsuccessful because the required fields were not completed correctly, you are directed to the Form Login Page details view and prompted to fill in the necessary information.
Log in to the Campus Portal as an administrator.
From the profile drop-down options, select Site Manager.
From the Site Manager side menu, click Form Login Pages.
Tip
Click the name of a form to view its complete information or make changes to the settings.
Log in to the Campus Portal as an administrator.
From the profile drop-down options, select Site Manager.
From the Site Manager side menu, click Form Login Pages.
Click the name of the login page form you want to edit.
Make changes as needed and click Save.
Log in to the Campus Portal as an administrator.
From the profile drop-down options, select Site Manager.
From the Site Manager side menu, click Form Login Pages.
Locate the form login page you want to delete and click the delete icon at the end of the row.
Click Yes on the confirmation pop-up.
Tip
Click No or the x in the corner of the pop-up to navigate back to the Form Login Pages list without deleting the form.
The form login page displays in the Form Login Pages list. If the login page is active and the current date is between the start and end dates, the page displays to associated users when they log in to Campus Portal.
After the user enters their log in credentials, the required form displays. The user can then either complete the form, submit it, and continue to Campus Portal or choose not to complete the form and log out of the system.
The login pages are presented to the user in the priority order defined when the page was created.
Note
A form login page must be Active and the current date must be between the start and end dates for it to display to users.
It’s possible for the form associated with a login page to be deleted from the FormFlow-Manage Forms page. When that happens, the login page is also deleted.
Note
If a user decides to delete a form associated with a login page, a warning displays to let them know that there is an associated login page and that the page will be deleted along with the form.
